 Security Users Users view User form
Administration Security Users Users view User form
You can use the User form to add and edit user accounts for your site. You can add users only to the current scope level or to a lower scope level. You cannot add users to scope levels higher than your current scope level. For example, if you are logged in at the Facility scope level, you can create users only at the Facility or the Yard scope levels. If you want to create users for multiple facilities, you must log in at the Complex or a higher scope level.
To add a user:
In the Users view (on page 1), click  .
.
N4 displays the User form.
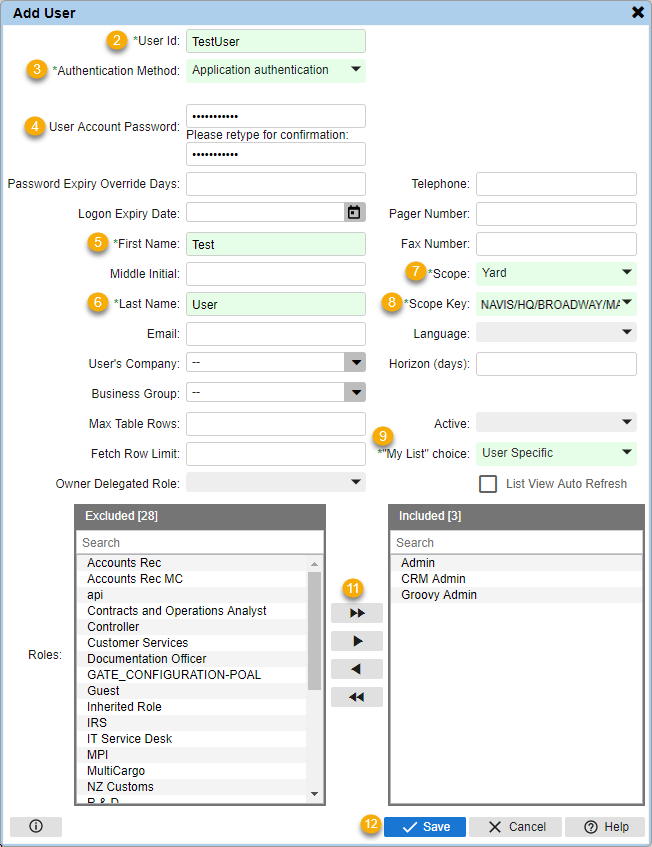
Enter a User Id that uniquely identifies the user. Once you save a user account, you cannot modify this ID.
For example, if you have a large number of user accounts, you can use the email address of a user as the User Id to ensure that the user ID is unique for all the users in your database.
Select one of the following Authentication Method for the user account:
Application authentication: If the user is always authenticated by N4.
External authentication such as LDAP: If the user is always authenticated by an external provider, such as LDAP.
Configurable Setting User Authentication Method Default: If the user's authentication method depends on the value specified for the FRMSECURITY024 (USER_AUTHENTICATION_METHOD_DEFAULT) (on page 1) configuration setting.
For more information, see How do I set up LDAP support for User Authentication? (on page 1)
Specify the User Account Password in the first field and then re-enter the same in the second field to confirm the password.
The value that you enter in the User Account Password field is case-sensitive. For example, if you enter the password as Welcome, it is not the same as welcome, WELCOME, or welCome.
Enter the user's First Name.
Enter the user's Last Name.
Select the highest Scope level at which the user can log in.
You can assign only the current scope level or any lower scope level to a user.
For example, if you log in at the Complex scope level, you can create users at the Complex, Facility, or Yard scope levels. If you log in at the Yard scope level, you can create users only at the Yard scope level.
Select the Scope Key for the specific operator, complex, facility, or yard the user can access.
At the Yard scope level, you can select only the yard where you have currently logged in. If you log in at the Facility or higher scope level, you can select any of the available yards or facilities.
Select one of the following options to determine how the "My List" choice will work for the user:
User Specific: Indicates that the Units: My List view displays only the units selected by the specified user.
Business Group: Indicates that all the users that have the same business group as the current user share the Units: My List view.
Company: Indicates that all the users that work for the same company as the current user share the Units: My List view.
If you select Business Group or Company as an option from the "My List" choice drop-down list, you must assign a Business Group or User's Company to the user account; otherwise, N4 defaults to the User Specific option.
Enter any optional information for the user account.
Include or exclude (on page 1) Roles for the selected user.
Click Save.
To edit an existing user:
In the Users view (on page 1), select the user account that you want to edit.
Click  .
.
N4 displays the User form. Use this form to edit the details of the user account.
You can also double-click a user account to display the User form.
See Also:
Optional fields in the User form
The following table lists the optional fields in the User form.
|
Field Label |
Description |
|---|---|
|
Password Expiry Override Days |
Enter the number of days after which the password associated with the user account expires after a user updates the password. For user accounts used for web services and other automated integrations, you can use this field to ensure that the password associated with these user accounts never expires. If you do not enter a value in this field, N4 uses the value specified in the FRMSECURITY015 (PASSWORD_EXPIRY_DAYS) (on page 1) setting to determine when the password for the user expires. |
|
Telephone |
Enter the user's telephone number. |
|
Logon Expiry Date |
Enter the last date the user can access N4. The user can no longer access N4 after the date specified in this field has passed. |
|
Pager Number |
Enter the user's pager number. |
|
Fax Number |
Enter the user's number for receiving fax messages. |
|
Middle Initial |
Enter the user's middle initial. |
|
|
Enter the user's Email ID. |
|
Language |
Select the language that N4 must use to display the user interface when the user logs in to N4. |
|
User's Company |
Select the organization, such as the trucking company, line operator, or railroad operator, with which the user is associated. You must select a value in this field, if you select the Company option in the "My List" choice field. |
|
Horizon (days) |
Enter the number of days in the past for which historical operational data should remain visible to you in a list view. If you do not specify a value, N4 uses 30 days as the default. The maximum value that you can set is 10000. If you set the horizon days appropriately, you can avoid seeing large number of records in a list view because N4 filters the following entities:
The Horizon days do not have any effect on the data listed in the Equipment Status view. If you need to see extensive history in the list views, you must set the horizon days to a high value. |
|
Business Group |
Select the business group (on page 1) with which the user is associated. When you associate a user account with a business group, the user can access only the data associated with at least one business organization represented by the selected business group. For example, if a user is associated with the business group ABC represented by line operator ABC, this user can access units owned by ABC and all units arriving or departing on an ABC vessel. Associating a user account with a business group prevents information owned by one organization such as a line operator, from being visible to a user or updated by a user for another organization. You must select a value in this field, if you select the Business Group option in the "My List" choice field. |
|
Max Table Rows |
Enter the maximum number of rows that N4 can display in a list view. If you specify a value in this field, it overrides the value specified for the FRMCARINA019 (MAX_TABLE_ROWS) (on page 1) configuration setting. If you set Max Table Rows as 0 (zero), N4 displays all the rows in the table in the list view. This increases the N4 response time for tables with large number of rows; however, some system administrators may require it. If you enter any other value, N4 displays that many rows in all list views. You cannot enter a negative value in this field. The Record Counter displays the number of records selected, the total number of records displayed in the list view, and the total number of rows in the table separated by a colon. For example, if you select 35 rows in the list view and the Max Table Rows is set as 500:
See also Exporting Data. |
|
Active |
Select whether the user account is active or not. If you select No, N4 marks the user account as inactive and you cannot use it to log in to N4. |
|
Deactivation Details |
Free text entry field to enter the deactivation details, such as the reason for deactivating a user. N4 enables this field only when you select No for the Active field. The Deactivated By and Deactivated Date fields capture the person who deactivated the information and date of deactivation, respectively. |
|
Fetch Row Limit |
Specify the maximum number of rows that N4 must display in a list view. The Fetch Row Limit field overrides the FRMCARINA025 (LIMIT_FETCH_GKEY) (on page 1) setting for your user login. |
|
Owner Delegated Role |
Select a Delegated role for the user if you want the user to be able to manage user accounts in N4. For more information, see Add or edit a Delegated role (on page 1). |
|
List View Auto Refresh |
N4ignores the List View Auto Refresh check box and always refreshes a list view automatically. N4 also ignores the FRMCARINA024 (TABLE_AUTOMATIC_REFRESH_ON_CHANGE) (on page 1) setting. |